Triggers allow you to perform multiple Actions, such as format scrubbing, text replacement, running Macros, and more. These Trigger Actions can be initiated manually or by various events.
To get started with triggers, right-click on the ClipboardFusion icon
in the system tray and click "
Settings." On the left-hand menu, click the "
Triggers (Scrub/Replace)" tab.
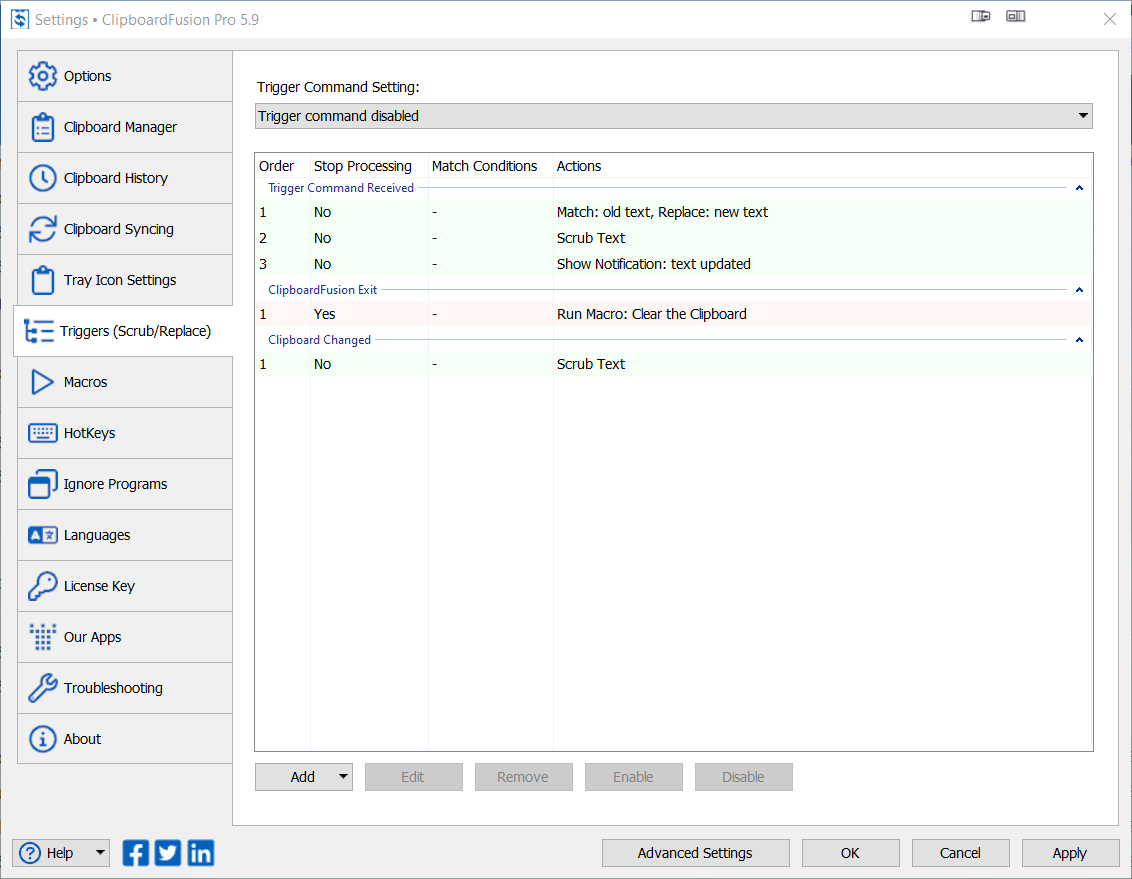
Here you can Add, Edit, Remove, and Disable triggers.
Existing Triggers are listed on the right, grouped by Event type (the activity that causes a Trigger to run, e.g., "ClipboardFusion Exit"). Trigger details (i.e., "Stop Processing" configurations, "Match Conditions," and "Actions") are listed in their respective columns.
Triggers of the same Event type run in a sequence, shown in the "Order" column (the first column of the Trigger table). To change the Order, drag and drop the Trigger using any part of the Trigger's row and move it up or down in the table. Triggers can only be moved within their Event type group (e.g., "Trigger Command Received").
The Order is important when considering which Actions may depend on the other and if Stop Processing has been enabled for the Trigger. To learn more on both, see
Add Triggers.
Triggers grouped under "Trigger Command Received" can be run using key combinations and menu options. For "Trigger Command Received" Events not run via the "
Run Triggers" menu option, the "Trigger Command Setting" lets you designate what key combination initiates the Trigger.
Options are to "Run Triggers on Copy" ('Ctrl + C' or 'Ctrl + C twice in succession'), "Run Triggers on double-copy" (Ctrl + C twice in succession), and "Run Triggers except on double-copy" ('Ctrl + C').
"Trigger Command Disabled" will prevent any Trigger Command Received option from running triggers reliant on that type of Event.
Select the Trigger Command Setting from the dropdown and click "Apply."
This setting applies to Triggers using the Event type "Trigger Command Received" and will not impact Triggers using other Event types.
Only Enabled Triggers will run. Enabled Triggers are highlighted in green, disabled in red. To toggle the state of a Trigger, click on the Trigger in the table and click the appropriate button ("Enable" or "Disable) near the bottom of the menu. The Trigger highlight will change colour to indicate the new state.
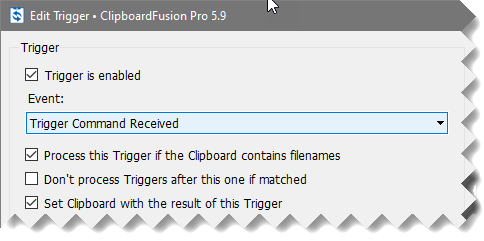
A Trigger can also be Enabled/Disabled from within the Edit Trigger menu. Click on a Trigger from the table and click the "Edit" button near the bottom of the Triggers menu.
Click the checkbox "Trigger is enabled" to toggle the state of the Trigger. Click "OK."
Returning to the "
Triggers (Scrub/Replace)" menu, click "Apply."
From the "
Triggers (Scrub/Replace)" tab in the "
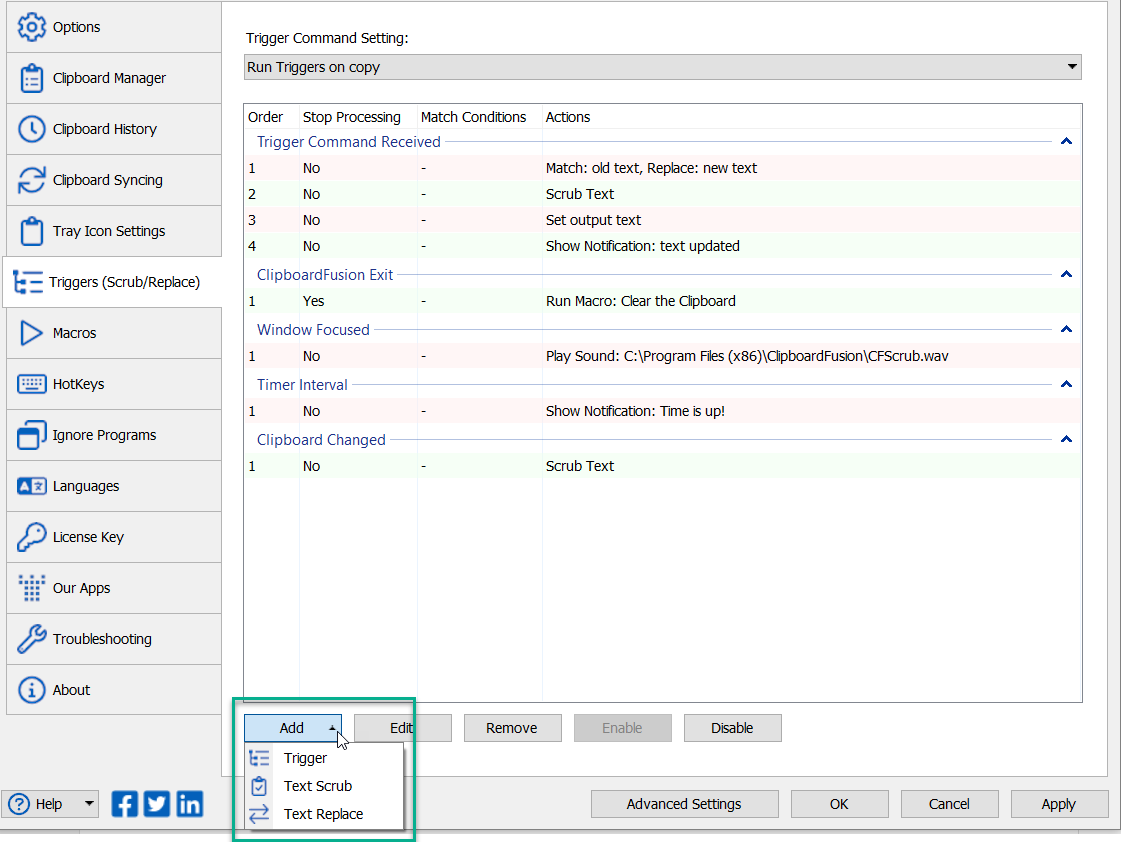
Settings" menu, click "Add."
The options in the dropdown menu are: "
Trigger," "
Text Scrub," and "
Text Replace."
Choosing "
Trigger" will open the Edit Trigger window for more options. "
Text Scrub" and "
Text Replace" are shortcuts to Actions available in the Edit Trigger window.
Selecting them from the "Add" dropdown will open settings windows to configure the particulars of that Trigger Action. Configuration options are detailed in
Edit or Remove Triggers.
Triggers added using these shortcut options will be added and grouped under the Event type "Trigger Command Received."Click on "
Trigger" to open the Edit Trigger window.
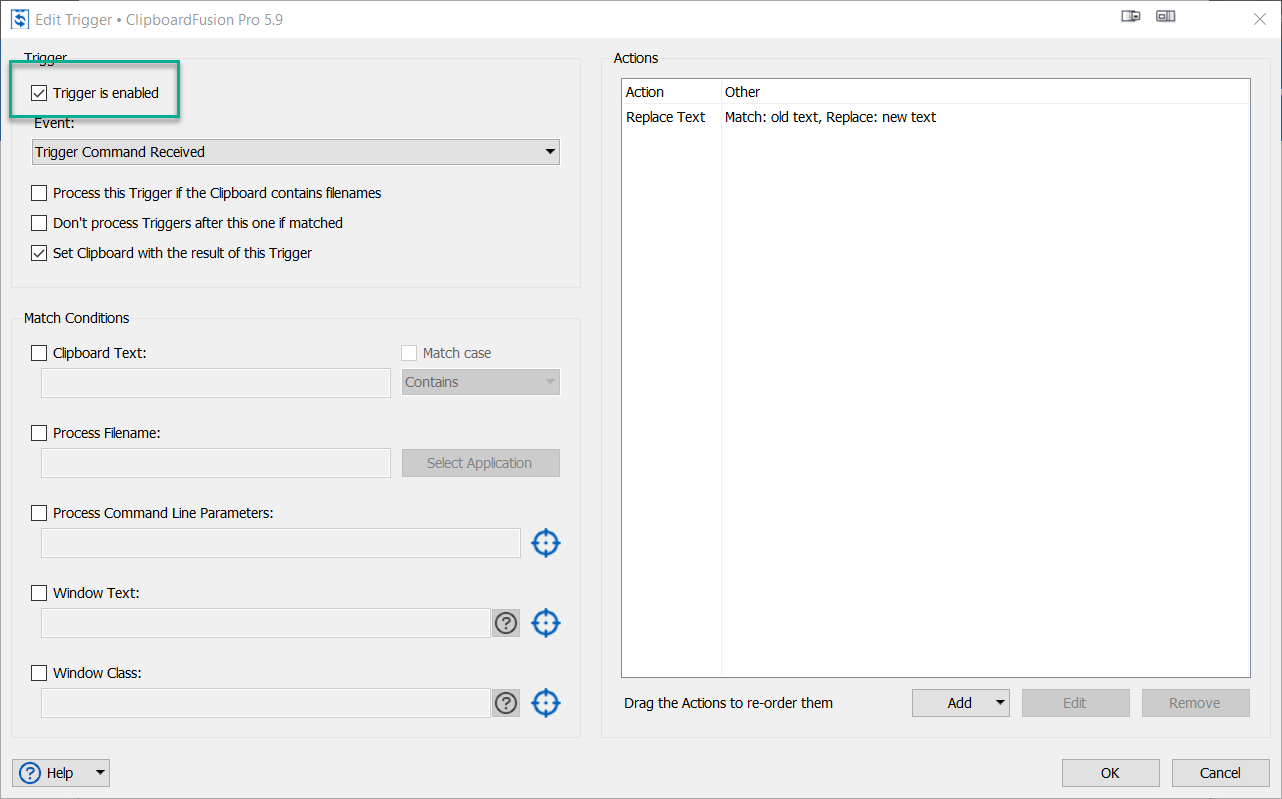
The top-left portion of the Edit Trigger window has basic configuration options. To allow the Trigger to run, ensure the checkbox "Trigger is enabled" is selected.
Disable the "Process this Trigger if the Clipboard contains filenames" checkbox if you don't want the trigger run when files are copied to the clipboard.
Because Triggers are run as sequences (if more than one Trigger is added for the Event type), you can choose to stop the Trigger sequence after a particular Trigger has been run. To do this, enable the checkbox "Don't process Triggers after this one if matched." When this option is disabled, subsequent Triggers in a sequence will be given the opportunity to run as long as their conditions are met.
If there is an output produced by a Trigger, that data can be added to the clipboard. To allow this, enable the checkbox "Set Clipboard with the result of this Trigger."
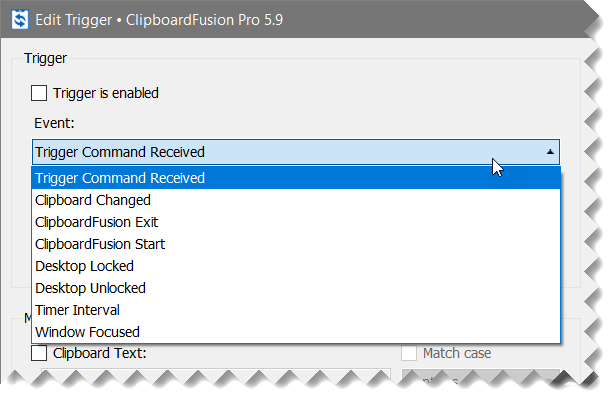
Triggers can be run using key combinations and menu options, or they can be configured to run based on certain Events. Click the "Event" dropdown selector to choose which Event type will initiate the Trigger.
Events include: "Trigger Command Received" (which requires either keyboard interaction (e.g., Ctrl + C) or selecting "
Run Triggers" from the ClipboardFusion menus), "Clipboard Changed" which depends on clipboard activity, "ClipboardFusion Exit" and "ClipboardFusion Start," which respond to the state of the ClipboardFusion software, "Desktop Locked" and "Desktop Unlocked," which rely on lock screen status, "Timer Interval," which is a time-based Event, and "Window Focused," which requires interaction with a window to begin.
For "Trigger Command Received" Events not run via the "
Run Triggers" menu option, the "Trigger Command Setting" in the main "
Triggers (Scrub/Replace)" menu lets you designate what key combination initiates the Trigger. See
Trigger Command Setting for more detail.
"Timer Interval" Event selection adds an Interval in seconds field to the menu, allowing you to specify the number of seconds to wait before initiating the Actions of the Trigger. This interval time will begin after clicking "Apply" from the main "
Triggers (Scrub/Replace)" menu, repeating on that interval.
The "Window Focused" event will respond to any newly-focused window interaction. To limit the focus to windows of particular applications or apply other restrictions, use Matching Conditions.
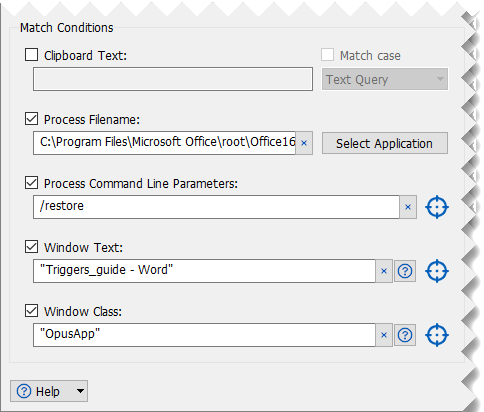
Triggers will be run based on the Event type chosen but can be restricted using matching conditions. These conditions include "Clipboard Text," requiring specific clipboard text matching, "Process Filename," restricting the Event to only run on a specific application, "Process Command Line Parameters," requiring more detailed conditions of the specific application, "Window Text," which lets you limit the Event to run on particular windows of an application, and "Window Class," which restricts the Event to run for specified application window classes.
To use any of these conditions, click the checkbox by the condition name to enable it.
For "Clipboard Text," specify the matching details using the "Match case" checkbox and dropdown. For "Process Filename," click "Select Application." In that prompt, and by the other Process/Window condition options, the crosshairs icon
is a drag-and-drop selector tool, making it easier to identify the details of each condition type. Drag and drop the crosshairs onto an application window to populate the corresponding fields.
The left side of the Edit Trigger window is for setting how and when the Trigger will run. On the right side of the Edit Trigger window are the Actions the Trigger will initiate.
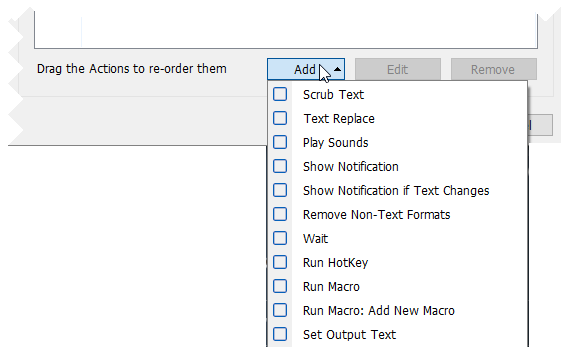
Click the "Add" button to display the Action selection menu. The available Actions cover a variety of activity.
For direct text-related Actions, there is "Scrub Text," which allows the removal of whitespace, line breaks, tabs, and HTML, "Text Replace," replacing matching text with new text, "Remove Non-Text Formats," which removes all non-text elements (e.g., images) from the clipboard item, and "Set Output Text," which sets specified text as the clipboard output.
Other Actions are dedicated to Notifications, including "Play Sounds," "Show Notification," and "Show Notification if Text Changes," which only runs if the clipboard text was altered by the other Trigger Actions.
The remaining Actions are "Wait," which allows you to set a pause in the Actions (in milliseconds), "Run HotKey," "Run Macro," and "Run Macro: Add New Macro." HotKeys and Macros will initiate their own actions based on their configuration. See
Macros for more detail.
Each Action selection will prompt you for further configuration. Select the desired elements, specify desired text and click "OK" ("Open" for "Play Sounds").
The Actions for each Trigger also run in a sequence. Drag and drop the individual Action to change that order.
Click "OK" from the Edit Trigger window when finished and click "Apply" from the main "
Triggers (Scrub/Replace)" menu.
From the Edit Trigger window, the Actions of the Trigger are listed on the right-hand side.
To Edit an Action, select the Action and click the "Edit" button. This will bring up the same configuration options as when the Action was added.
To Remove an Action, select the Action and click the "Remove" button.
Click "OK," and from the main "
Triggers (Scrub/Replace)" menu, click "Apply."
To edit Triggers, go to the main "
Triggers (Scrub/Replace)" tab via the "
Settings" menu. Select a Trigger from the table and click "Edit." This will take you to the Edit Trigger menu where you can alter Event configurations, match conditions, and the Actions the Trigger will initiate. When finished editing, click "OK."
To remove a Trigger, select the Trigger and click the "Remove" button near the bottom of the window.
When finished, click "Apply."
Triggers can be run using HotKey combinations, menu options, via the system tray, or they can be configured to run based on certain Events. Triggers of the same Event group will be run in a sequence. To learn more, see
Trigger Order.
A variety of Events can initiate a Trigger. See
Events for the types of Events available and their configuration details. Triggers under the "Trigger Command Received" Event can be run using key combinations and menu options. For "Trigger Command Received" Events not run via the "
Run Triggers" menu option, the "Trigger Command Setting" lets you designate what key combination initiates the Trigger. See
Trigger Command Setting for details.
To set a Hotkey for Triggers, go to the "HotKeys" tab on the "
Settings" menu. There are two options that can be configured with HotKeys: "Run Triggers on Clipboard text now," and "Run Triggers on Clipboard text now and paste."
Select the Action from the list and click the "Edit" button below the list. From the Key Combination prompt, assign the desired keys and click "OK." To run that selected Trigger Action, use the Key Combination you designated.
Click "Apply" in the Settings menu to save your changes.
The Clipboard Manager has an option for running Triggers as well. On any clipboard item, right-click and select "
Run Triggers." The "Trigger Command Received" Trigger sequence will be run on that clipboard item.
Triggers grouped in the "Trigger Command Received" sequence can also be run via the system tray menu. Right-click the ClipboardFusion icon
in the system tray and click "
Run Triggers." The "Trigger Command Received" Trigger sequence will be run on the current clipboard item.
Clicking on the system tray icon can also initiate Triggers. To specify which action (i.e., Single-Click or Double-Click) will run your Triggers, go to the "
Tray Icon Settings" tab in the "
Settings" menu, select the desired options from the "Tray Icon Click Action" section, and click "Apply."
Macros are small programs that can be run on clipboard items for quick and repetitive alterations, but they are not limited to clipboard actions.
To get started with Macros, right-click on the ClipboardFusion icon
in the system tray and click "
Settings." On the left-hand menu, click the "
Macros" tab.
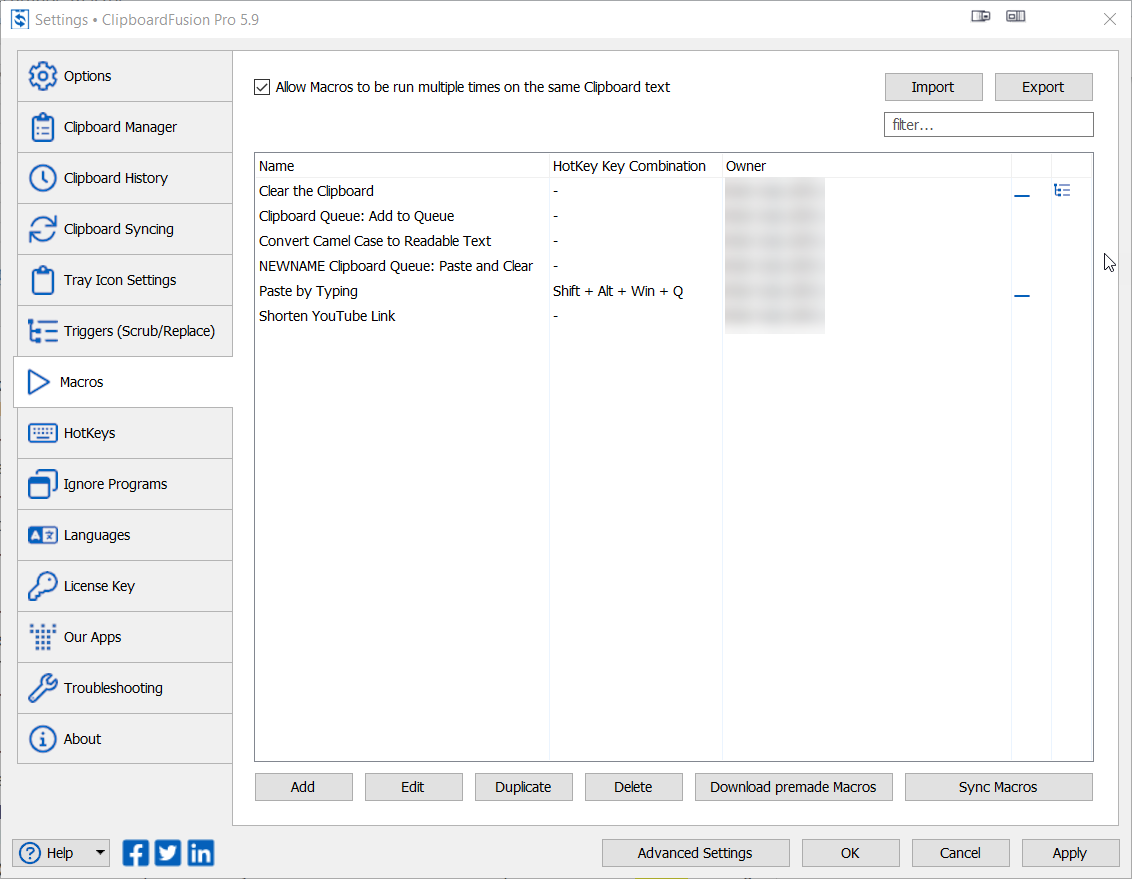
Here you can Add, Edit, Delete Macros. There are also options to import and download premade Macros, as well as Sync them for use on other systems where the same user is logged into ClipboardFusion.
The existing Macros are listed on the right-hand side, along with their HotKey Combinations (if designated), Owner, and indicators if the Macro is used by a Tray Action and/or a Trigger. The dash icon
indicates Tray Action usage and the list tree icon
indicates Trigger usage. Tray Action settings are available via the "
Tray Icon Settings" tab in the "
Settings" menu. To learn more about Macros in Triggers, see
Add Triggers.
At the top of the Macros tab is the option to run Macros multiple times on the same Clipboard text. Enable that checkbox to allow this action.
From the "
Macros" tab in the "
Settings" menu, click the "Add" button.
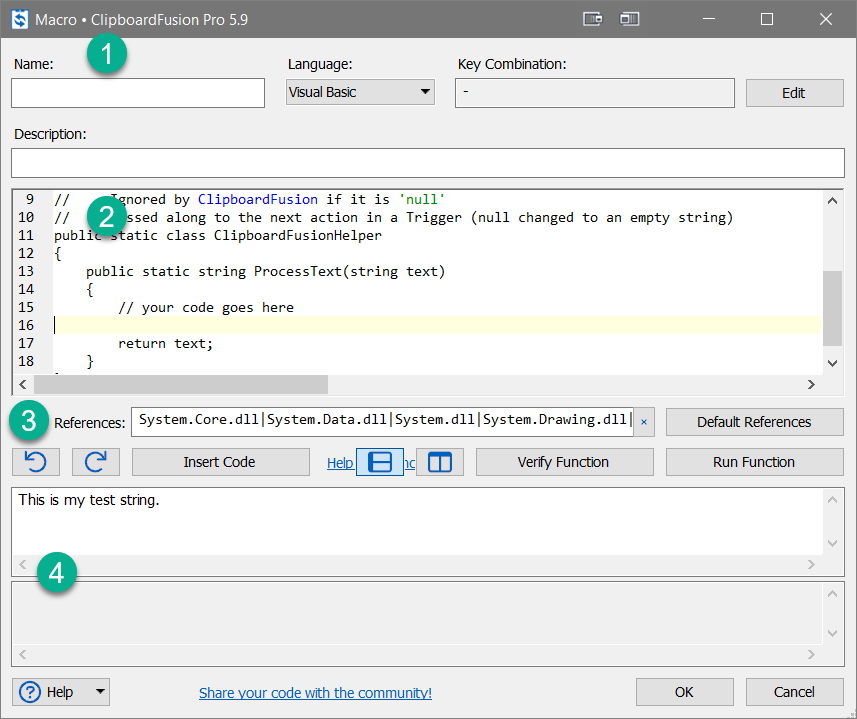
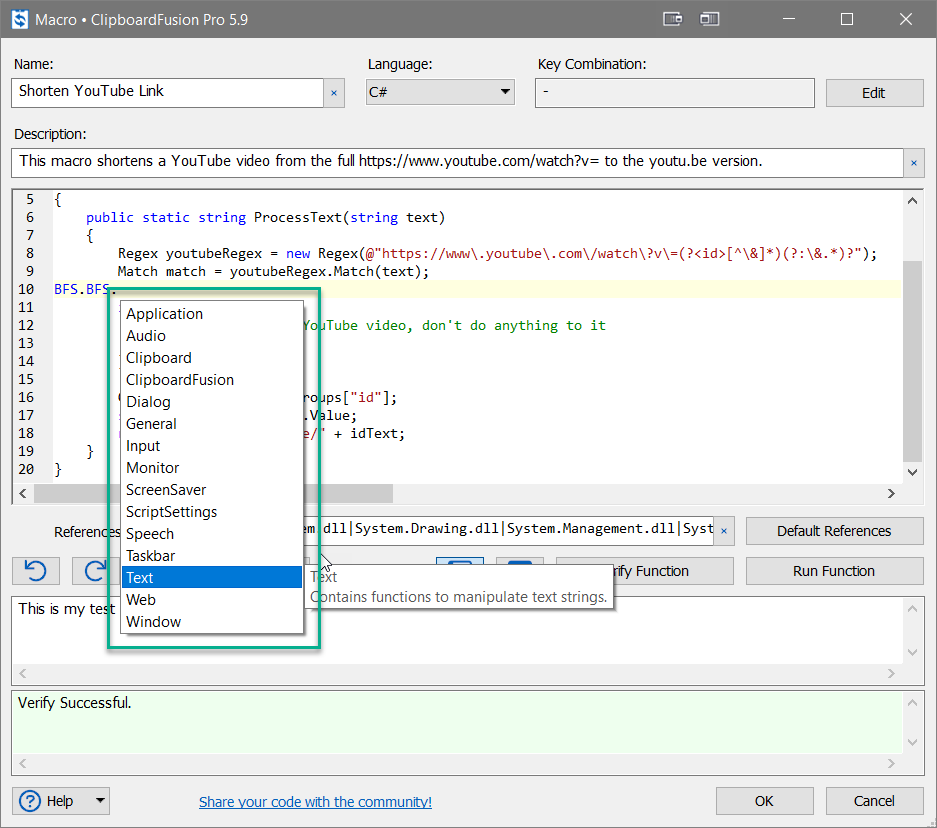
A Macro editor window opens allowing you to write and edit code for functions of the Macro.
The Macro editor has several sections: The metadata (1), the code editor (2), the editing controls (3), and the input and error/output windows (4).
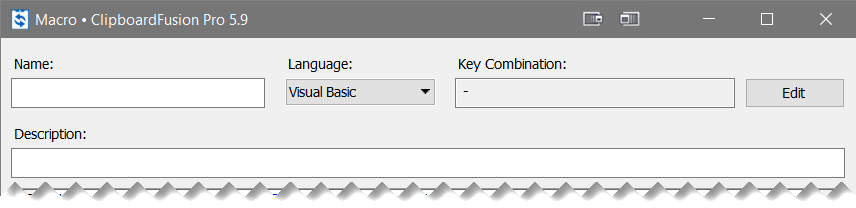
Enter a name for your Macro in the "Name" field with details of the Macro's purpose in the "Description" field below. The editor allows for two coding languages (i.e., C# and Visual Basic). Choose one from the "Language" dropdown. This will result in resetting all code in the code editor window. A warning prompt will ask you to confirm the change. Click "Yes" to continue.
You can assign a HotKey combination used to run the Macro once completed. Click "Edit" in the upper-right of the Macro editor prompt window. A second prompt will ask for the key combination. Input the desired keys and click "OK."
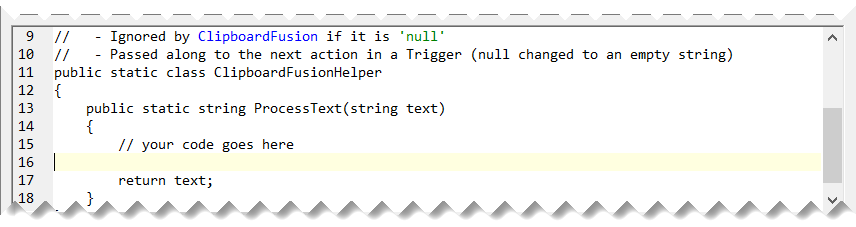
Within the editing window is all the default scripted function code with room for the user's chosen functions which customizes the Macro.
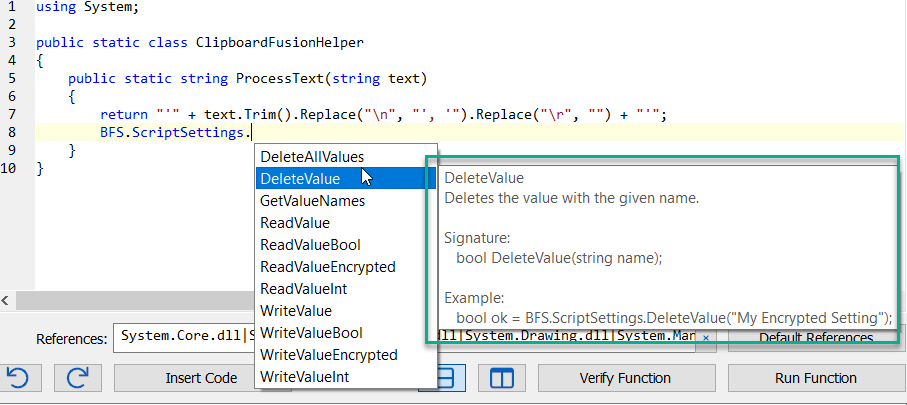
Each language selection has the comment "// your code goes here" already added to the code, indicating where functions may be added. Add code here by typing or using the "Insert Code" button in the editing controls section (3). Typing 'BFS.' will display a list of options for completing functions used in various Binary Fortress software. These same options are displayed using the "Insert Code" button.
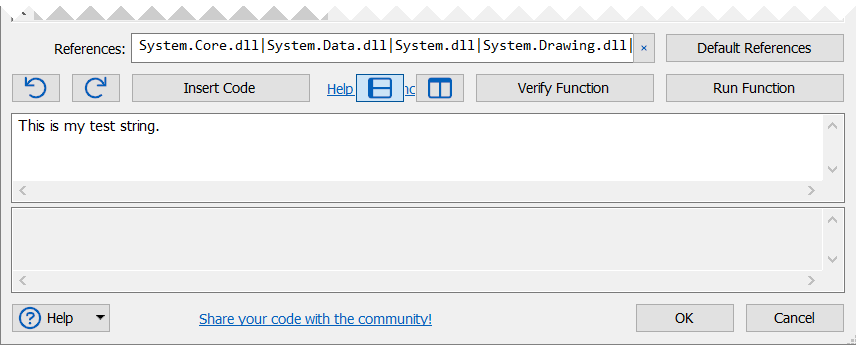
The references used by the code are listed in the "References" field and are populated with defaults when the language is chosen. These can be edited by typing in the field using pipe ('|') as a separator. To reset the references field to their default entries, click the "Default References" button on the right-hand side.
The second row of the controls section have undo/redo
/
, window toggle (i.e., horizontal
and vertical
), "Insert Code," "Verify Function," and "Run Function" buttons.
Clicking "Insert Code" will display a menu of available functions. Clicking each will then display a submenu to further define the selected function.
Hovering on the menu item shows the description, signature (formatting parameters) and usage examples for the function.
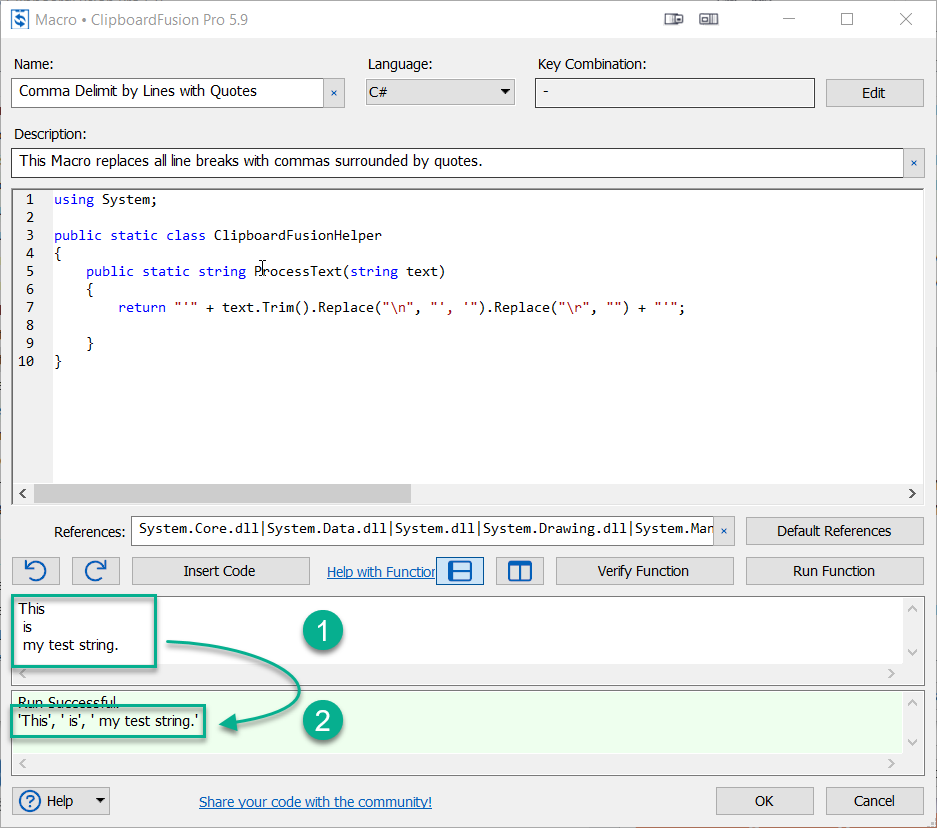
Clicking "Verify Function" or "Run Function" checks the code for errors, reporting them in the second window of the bottom section of the editor (4). Errors will be listed and highlighted in red. When the functions are working correctly, clicking "Verify Function" will display "Verify Successful," highlighted in green.
When clicking "Run Function" on successfully-written code, the input text entered in the input window (1) will be processed by the Macro functions, displaying the sample output along with "Run Successful" (2).
When satisfied with your Macro code, click "OK."
Pre-made Macros can be imported from user file locations or downloaded from the Binary Fortress Macro repository.
Go to the "
Macros" tab in the "
Settings" menu.
For importing saved Macros, click the "Import" button in the upper-right section of the Macros window. The file selection prompt will appear allowing you to choose a "cfmacro" file. Choose the Macro file and click "Open."
The code and name, as well as the HotKey combination, can be altered at this time or edited later.
From the Macro editor prompt, click "OK" to import the Macro and "Cancel" to cancel the import.
To download Macros from the Binary Fortress repository, click the "Download premade Macros" button on the bottom-right of the main Macros window. This will display a prompt with the existing Macros repository table. (An Internet connection is required to load and populate this prompt.)
Select the Macro(s) you wish to download and click the "Install Macro(s)" button in the lower-right of the window. Each selected Macro will display its code in the Macro editor for review and understanding. The code and name, as well as the HotKey combination, can be altered at this time or edited later.
Click "OK" to download the Macro and "Cancel" to cancel the download. (When downloading multiple Macros, "Cancel" will only cancel the Macro currently displayed, moving on to the next Macro in the list.) Newly added, downloaded, and imported Macros will be listed in the table of the Macros window.
Click "Apply" in the Settings menu to save your changes.
To edit, duplicate, or delete Macros, go to the main "
Macros" tab via the "
Settings" menu.
Select a Macro from the table and click "Edit." This will open the Macro editor window. Here you can alter the metadata (e.g., Name and Description), create or edit the HotKey combination, and edit and test the code. When finished editing, click "OK."
To duplicate a Macro, select the Macro from the list on the main "
Macros" tab and click "Duplicate." A copy of the Macro will appear in the list, appended with "(Duplicate)."
To delete a Macro, select the Macro from the list on the main "
Macros" tab and click "Delete."
When finished, click "Apply."
ClipboardFusion allows for syncing data across your software installations, meaning clipboard data from one computer can be accessed by the same user on another computer. Macros are also available data to be synced.
Macros can be synced using the "Sync Macros" button on the "
Macros" tab of the "
Settings" menu, but any Sync menu option will also include the Macros.
To use the Sync option in the Clipboard Manager, Clipboard Syncing must be enabled and you must be logged into the same Binary Fortress account on both systems. Access to both requirements is available in the "
Clipboard Syncing" tab of the "
Settings" menu. (See
Clipboard Syncing for more detail.)
Macros can be run using Hotkeys, as part of a Trigger Action sequence, through the Clipboard Manager, or via the system tray menu.
To run a Macro with a Hotkey, you need to set the Hotkey during add/download/import or edit Macros already listed in the "
Macros" tab window. To edit the Macro and assign a HotKey, go to the "
Macros" tab in the "
Settings" menu, select the Macro from the list, and click the "Edit" button below the Macros list.
In the Macro editor prompt, click the "Edit" button in the upper-right. From the new prompt designate the HotKey key combination desired and click "OK." When returned to the Macro editor prompt, click "OK" again. To run that Macro in the future, use the key combination you designated.
Running Macros through Triggers requires the Macro to be added as an Action. Go to the "
Triggers (Scrub/Replace)" tab in the "
Settings" menu. Click "Add" and select "Trigger" from the dropdown or click on an existing Trigger and click "Edit." Both will prompt the Trigger's configuration options.
On the left-hand side are Trigger initiation options and matching conditions. On the right-hand side are the Actions the Trigger will carry out. To add a Macro to the Actions, click "Add" in the bottom-right and select either "Run Macro" or "Run Macro: Add New Macro."
"Run Macro" will display a prompt with Macros already added, imported, or downloaded. (See
Add Macros or
Import/Download Macros for more information.) Select the Macro you want and click "OK."
"Run Macro: Add New Macro" will bring up the Macro editor window, allowing you to write your own new Macro. When finished with the Macro code, name it, add a description, and designate a HotKey key combination if you want to run the Macro independently as well using the HotKey. Click "OK." From the Trigger prompt, click "OK." When this Trigger is run, the Macro will run as part of its Action sequence.
Click "Apply" in the Settings menu to save your changes.
New Macros will also be listed in the " Macros" tab and (when applied) the " Macros" tab of the Clipboard Manager.
The Clipboard Manager has an option for running Macros as well. On any clipboard item, right-click and select "
Run Macro," then select the Macro from the list. The Macro will be run on that clipboard item. To run a Macro on the current clipboard item, go to the "
Macros" tab in the clipboard manager and left-click on a Macro from the list.
The Macro list is also available via the system tray menu. Right-click the ClipboardFusion icon
in the system tray, click on the "
Macros" tab, and select the Macro you wish to run. This will use the current clipboard item as the input if needed.
Clicking on the system tray icon can also initiate Macros. To specify the Macro to run as well as the action (i.e., Single-Click or Double-Click) to run it, go to the "
Tray Icon Settings" tab in the Settings menu, select the desired options from the "Tray Icon Click Action" section, and click "Apply."
ClipboardFusion makes it easy to remove clipboard text formatting, replace clipboard text or run powerful macros on your clipboard contents! You can even sync your clipboard with other computers and mobile devices.
To learn more about ClipboardFusion, visit:
https://www.clipboardfusion.comBinary Fortress has spent 19 years in pursuit of one goal: create software to make life easier. Our software ranges from display management and system enhancement utilities to monitoring tools and digital signage. IT administrators, professional gamers, coffee-shop owners, and MSPs all rely on Binary Fortress to make their days better, and their lives easier.
Copyright © 2007-2026 Binary Fortress Software, all rights reserved.
The Binary Fortress logo is a trademark of Binary Fortress Software.
The ClipboardFusion logo is a trademark of Binary Fortress Software.
Binary Fortress Software
1000 Innovation Drive, Suite 500
Kanata, Ontario, Canada
K2K3E7
https://www.binaryfortress.com