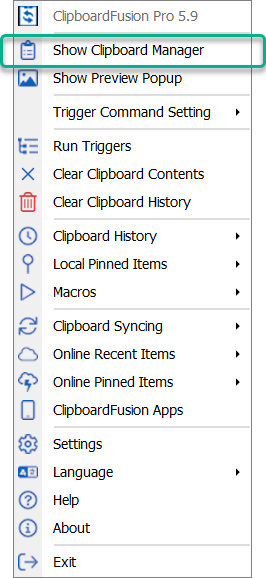
The Clipboard Manager is an independent window housing your various clipboard items (local and online) as well as your Macros. To open the Clipboard Manager, right-click the system tray menu icon
and click "
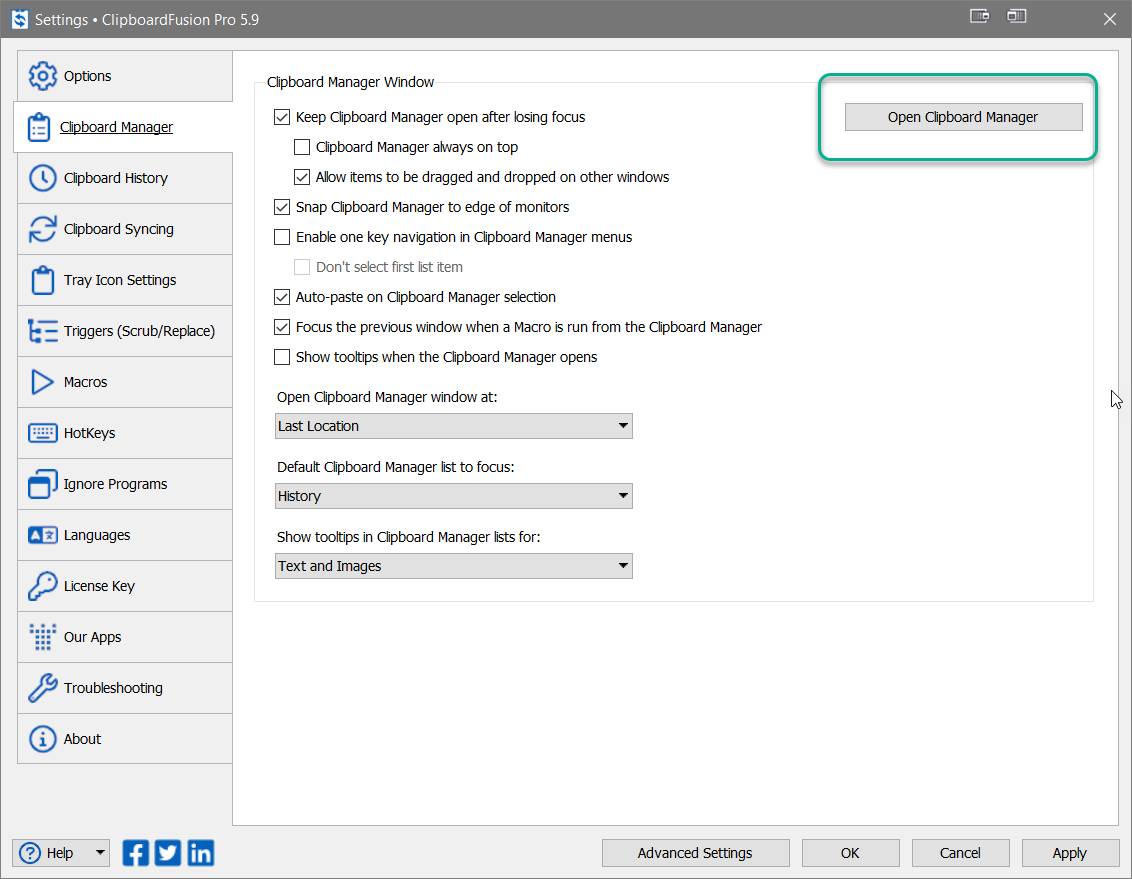
Show Clipboard Manager." This can also be done with the "Open Clipboard Manager" button in the Clipboard Manager tab of the Settings menu.
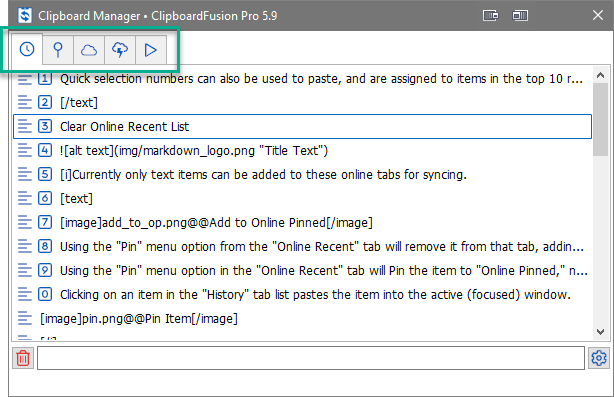
There are several tabs in Clipboard Manager: "
History" (Clipboard History), "
Pinned" (Local Pinned), "
Online Recent", "
Online Pinned", and "
Macros."
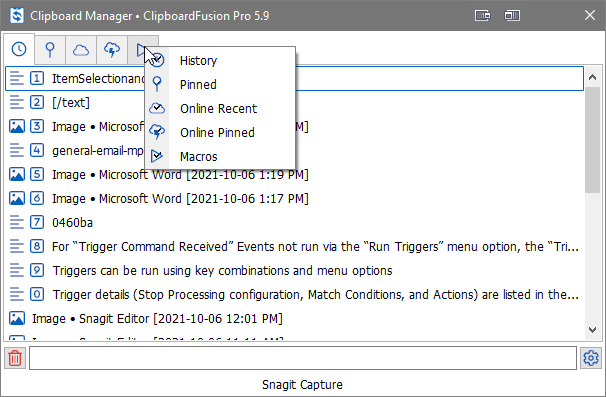
Right-clicking on any of the tabs displays the full tab list. Clicking on the name of any tab within that menu toggles between enabled and disabled states. If one of your tabs is missing from the Clipboard Manager, it has been disabled and can be reenabled via this right-click tab list.
"History" and "Pinned" list items are added to the local system clipboard. "Online Recent" and "Online Pinned" are for clipboard items to be synced across multiple systems. Consider these tab lists 'in-the-cloud' versions of your local "History" and "Pinned" item lists. "Macros" lists your saved Macros and can also be synced.
For quick understanding of clipboard items, icons are displayed in the left-most column representing text
, images
, and files
.
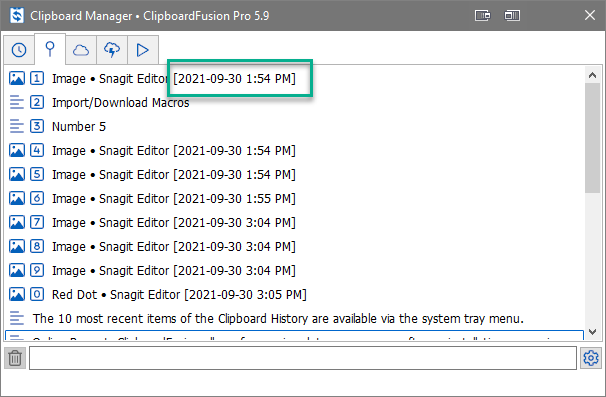
To preview the copied item, hover over it with your mouse.
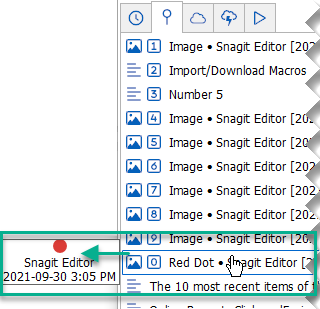
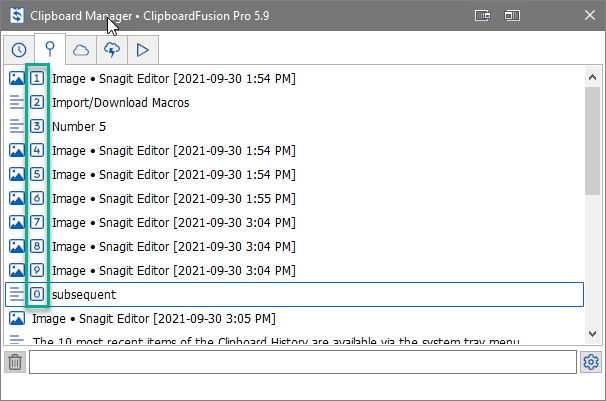
The top 10 items in each tab of the Clipboard Manager have numbers
through
next to them.
These allow for quick selection using the corresponding number beside the clipboard item. Depending on the tab and ClipboardFusion settings, quick selection will behave differently.
When using the quick selection numbers on the "
Macros" tab, the corresponding Macro will run using the current clipboard data as input (if needed).
Quick selection use on the remaining tabs results in more standard clipboard activity. With the Clipboard Manager active, pressing the number on the keyboard will copy that item again (the same action as selecting "
Copy to Clipboard" from the right-click menu), moving that copied item into the top position of "
History" (and "
Online Recent" if configured to automatically sync copied text).
" Pinned" and " Online Pinned" items will not change their order when quick selection is used.
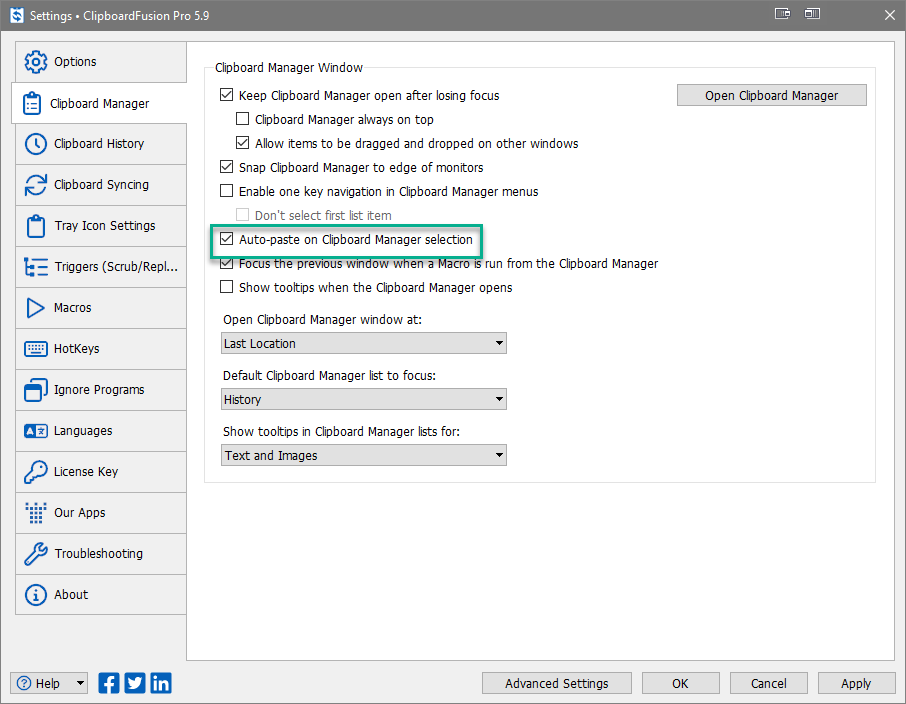
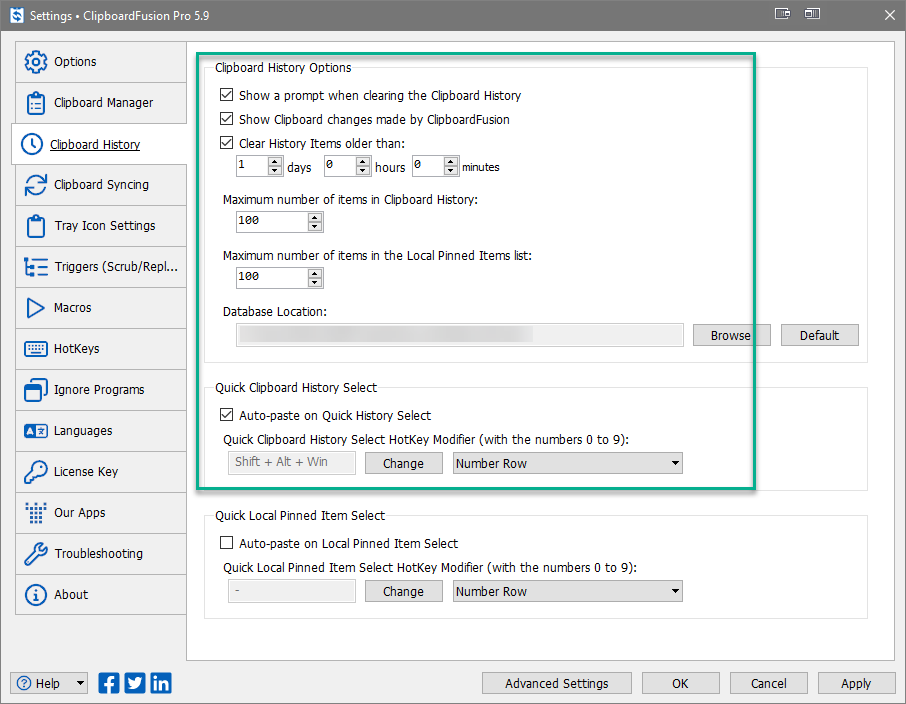
To have this quick selection action automatically paste the item instead of merely copying it, go to the "
Settings" menu, click the "
Clipboard Manager" tab, and enable the checkbox by "Auto-paste on Clipboard Manager selection."
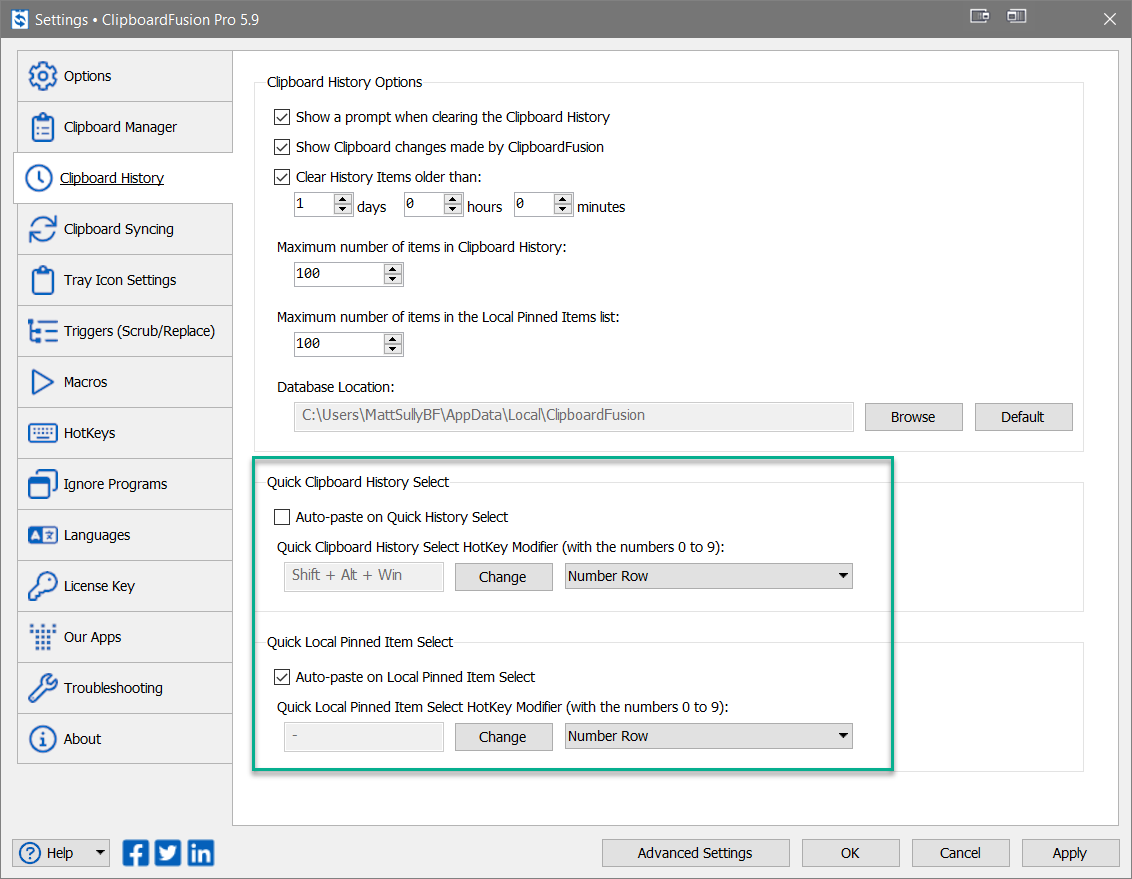
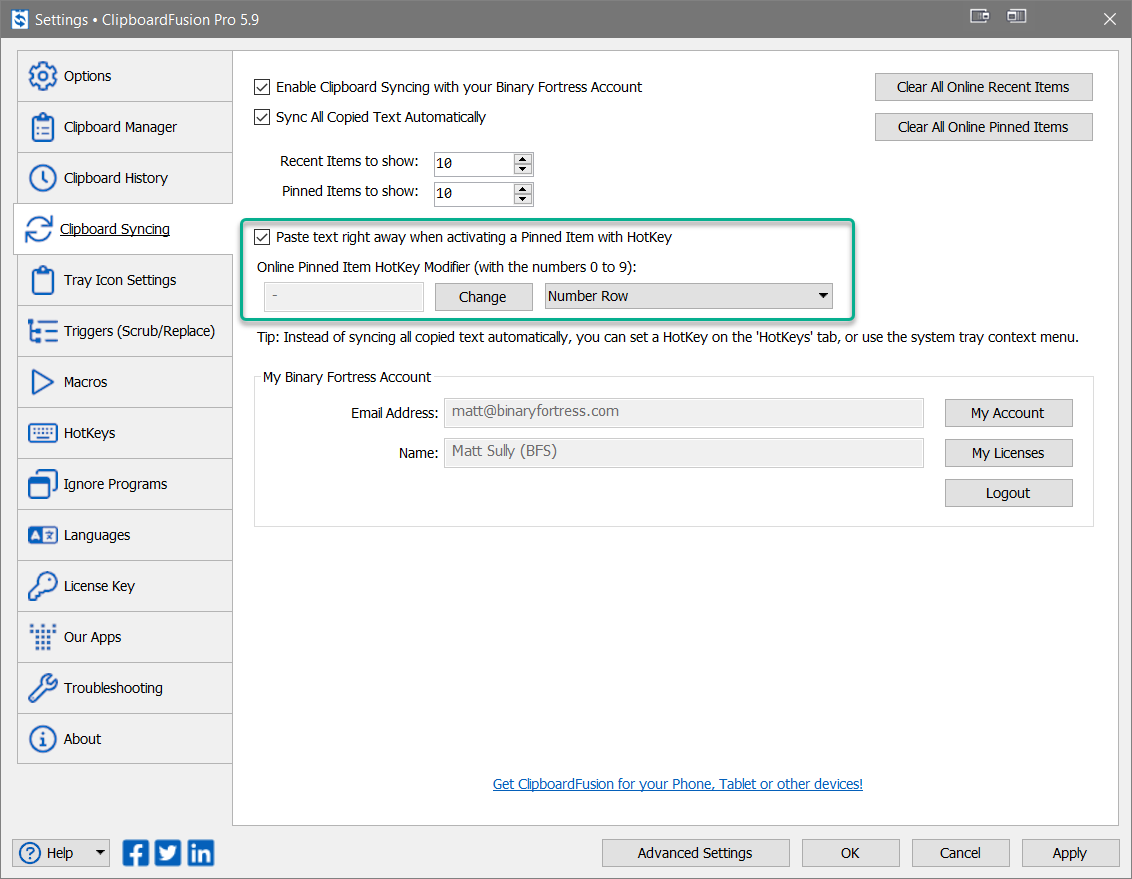
The tabs "
History", "
Pinned" and "
Online Pinned" allow for HotKey Modifiers to be used with the corresponding item list number. To configure the HotKey Modifiers for the "History" and "Pinned" tabs, go to the "
Settings" menu and click on the "
Clipboard History" tab. For the "Online Pinned" tab, click the "
Clipboard Syncing" tab instead.
To add or edit a HotKey Modifier, click the "Change" button, select the desired Modifiers, and click "OK." To have the HotKey action auto-paste items, enable the checkbox above the HotKey Modifier configurations.
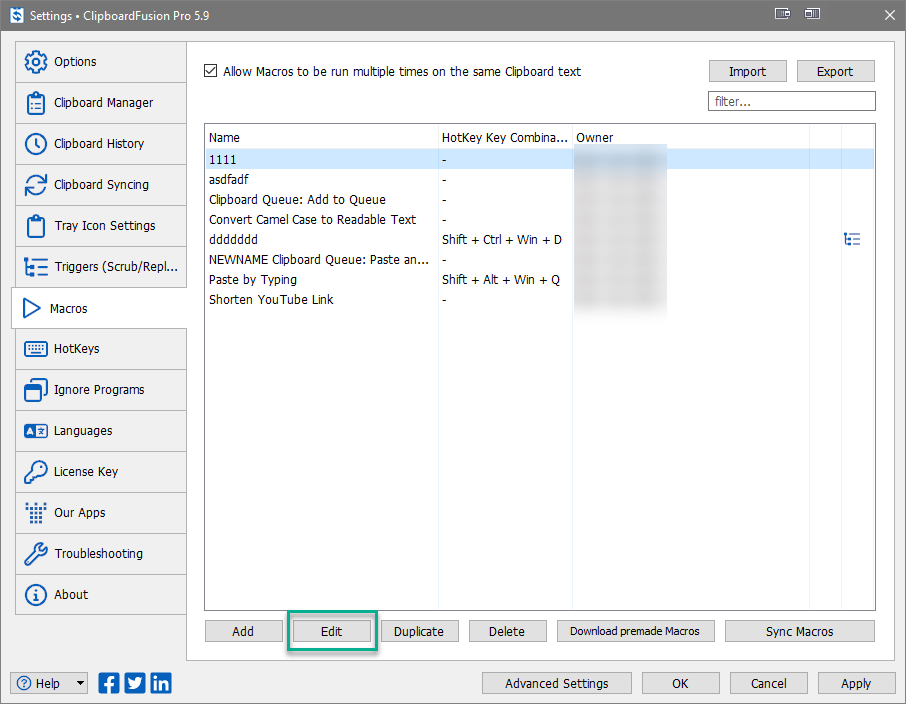
Macro HotKey combinations are configured via the "
Macros" tab of the "
Settings" menu. From the "
Macros" menu, select the Macro and click "Edit."
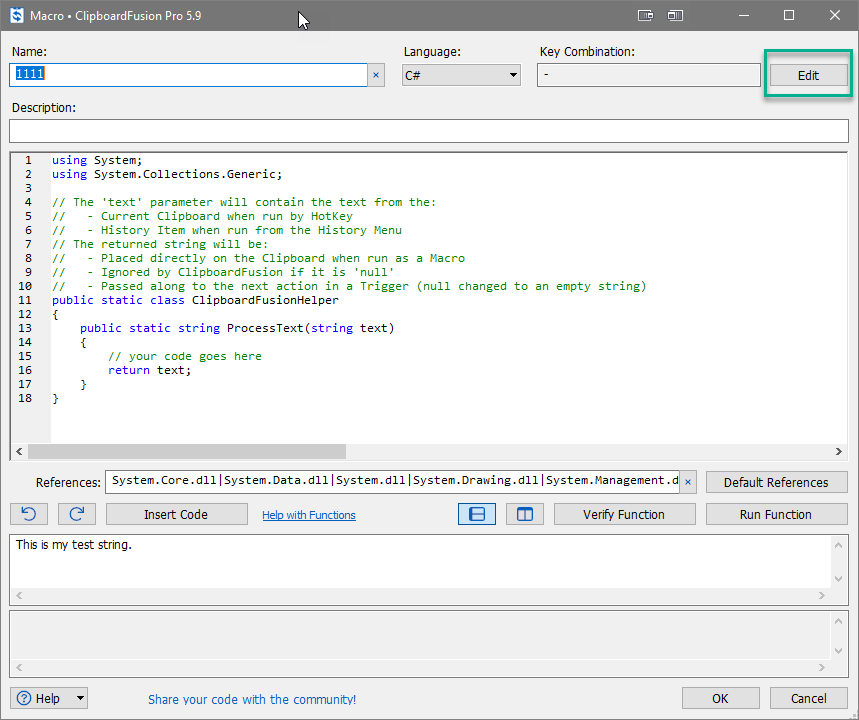
From the Macro editor window, click "Edit." Choose the HotKey modifier combination and click "OK." Click "OK" on the Macro editor window. When finished with your Settings changes, click "Apply."
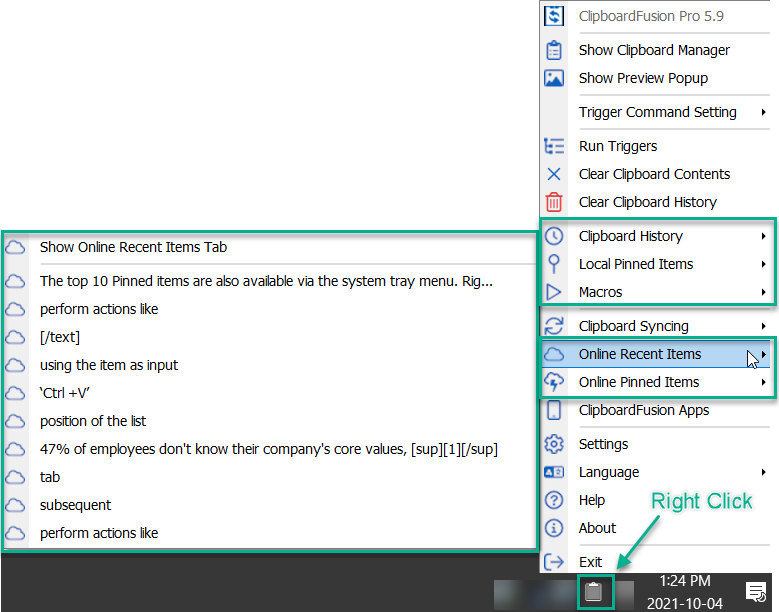
These same quick-selection "Top 10s" are available via the system tray menu.
Right-click the ClipboardFusion icon
in the system tray and click on "
Clipboard History," "
Local Pinned Items," "
Online Recent Items," or "
Online Pinned Items" to see the related item lists. "
Macros" will display all available Macros. Within each list, click "Show [tab name]" to display that tab of the Clipboard Manager.
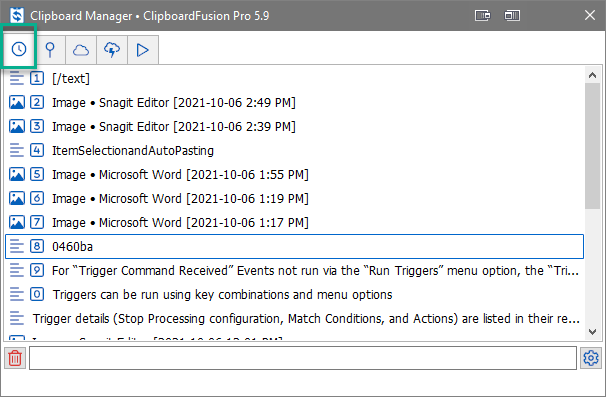
"
History" is a list of the most recent items sent to your clipboard. To navigate to the "History" tab, right-click the system tray menu icon
and click "
Show Clipboard Manager." From the Clipboard Manager window click the tab with the clock icon
.
By default, the "History" tab holds 100 copied items for the most recent 5 days. To configure these as well as other options, click on the "
Clipboard History" tab in the "
Settings" menu.
Change any desired settings and click "Apply."
'Copy,' 'Cut,' and 'Paste' actions initiated through either menus or standard keyboard shortcuts, (i.e., 'Ctrl + C,' 'Ctrl + X,' and 'Ctrl +V'), will add items to your local clipboard. Acting as an enhanced extension to your local clipboard, ClipboardFusion will also display these clipboard items in the "History" tab of the Clipboard Manager. The newest items are put into the top-most position of the list.
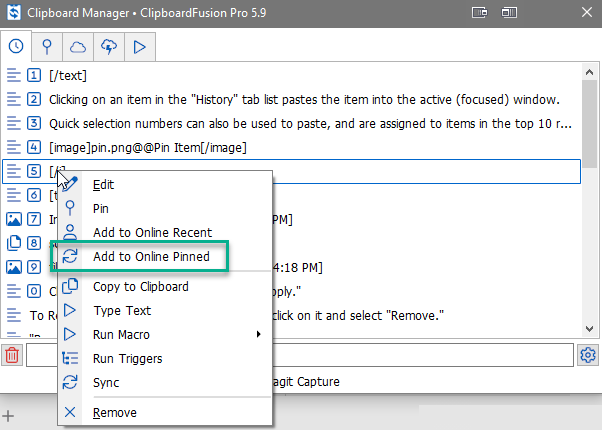
Clicking on an item in the "
History" tab list pastes the item into the active (focused) window. Quick selection numbers can also be used to paste, and are assigned to items in the top 10 rows of each tab.
To learn more about these, see Item Selection and Auto-Pasting.
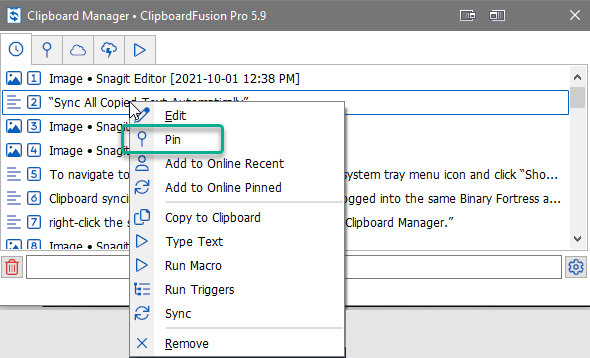
Right-clicking an item gives the option to "
Pin" it, "
Remove" it, "
Copy to Clipboard" as the current copied item, "
Run Macro" using the item as input, and "
Run Triggers" using the item as input.
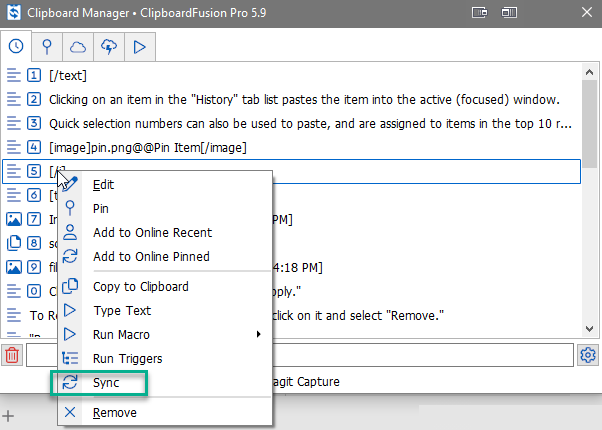
The "
Sync" option updates the "Online Recent," "Online Pinned," and "Macros" lists with the online servers.
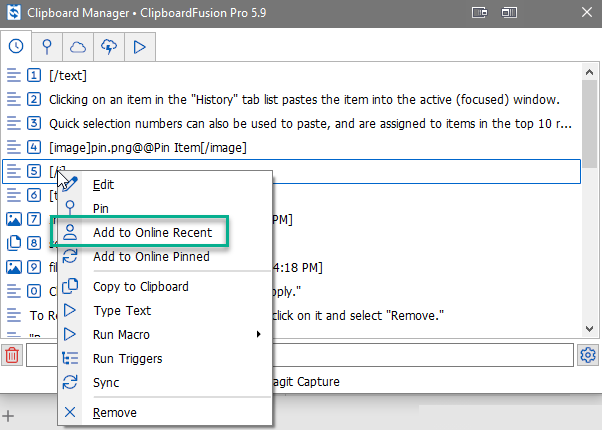
Specific types of clipboard items have different options. For text
items, the text can be edited using the "
Edit" option or pasted one character at a time using the "
Type Text" option. You may also copy the text to the online tabs, clicking either "
Add to Online Recent" or "
Add to Online Pinned."
Images
can be saved to a file with the "
Save Image to File" option.
To Remove a single item from the list, right-click on it and select "
Remove." To clear all the items from the "History" tab, click the Delete icon
in the lower-left of the Clipboard Manager. From the confirmation prompt, click "Yes."
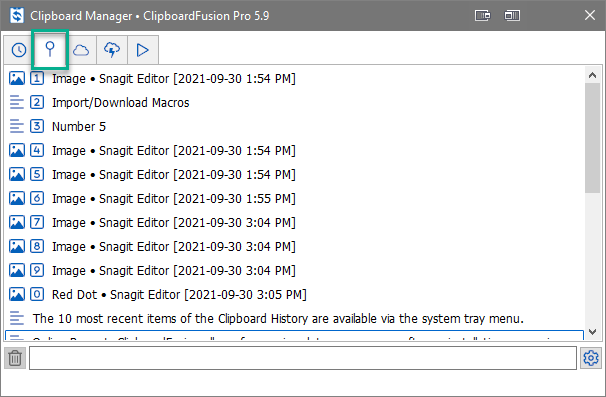
Pinned items are clipboard items saved for repeated use. To navigate to the "
Pinned" tab, right-click the system tray menu icon
and click "
Show Clipboard Manager." From the Clipboard Manager window, click the tab with the pin icon
.
By default, the "Local Pinned" list holds 100 clipboard items. To configure the number of items kept as well as other options, click on the "
Clipboard History" tab in the "
Settings" menu.
Change any desired settings and click "Apply."
To add clipboard items to the "Pinned" tab, right-click on the item listed in the "
History" tab and select "
Pin."
Newly-added Pinned items will move to the bottom of the "Pinned" list. Their placement can be altered by right-clicking the item and selecting "
Move Up" or "
Move Down" or by dragging and dropping the item to its new location in the list.
Images will have their clipboard-added time updated when copied to the Pinned list. Using the " Pin" menu option in the " Online Recent" tab will Pin the item to " Online Pinned," not the local "Pinned" tab.
Clicking on an item in the "Pinned" tab pastes the item into the active (focused) window. Quick selection numbers can also be used to paste, and are assigned to items in the top 10 rows of each tab.
To learn more about these, see Item Selection and Auto-Pasting.
Right-clicking a Pinned item gives the option to "(
/
) Move" it, "
Edit" it, "
Remove" it, and rename it with "
Edit Name." You can also "
Copy to Clipboard" (which moves it to the first position in the "History" tab as the current copied item), "
Run Macro" using the item as input, and "
Run Triggers" using the item as input.
The Name (identifiable label) of the item can be altered using the "Edit Name" option. Right-click on the item and select "
Edit Name." Type the new name in the field of the naming prompt and click "OK."
The "
Sync" option updates the "Online Recent," "Online Pinned," and "Macros" lists with the online servers.
Specific types of clipboard items have different options. For text
items, the text can be edited using the "
Edit" option or pasted one character at a time using the "
Type Text" option. You may also copy the text to the online tabs, clicking either "
Add to Online Recent" or "
Add to Online Pinned." Images
can be saved to a file with the "
Save Image to File" option.
The "Local Pinned" items list cannot be cleared in bulk; items must be individually removed. Right-click on the item and select "
Remove."
ClipboardFusion allows for syncing data across your software installations, meaning clipboard items from one computer can be accessed by the same user on another computer. Tabs of the Clipboard Manager that utilize syncing include "
Online Recent," "
Online Pinned," and "
Macros."
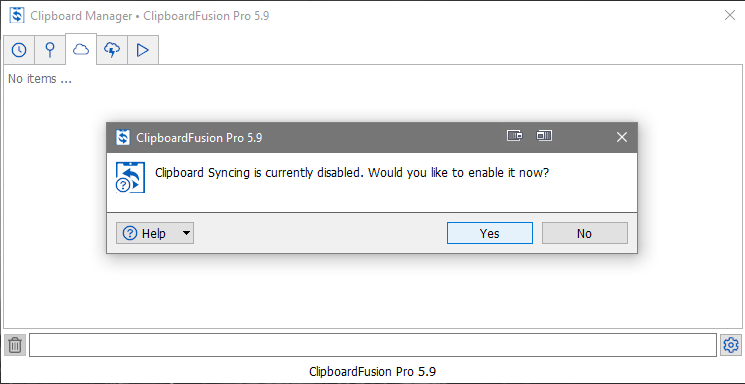
If you are not configured to use Clipboard Syncing and click on a tab that requires Syncing ("Online Recent" and "Online Pinned"), you will see the message below:
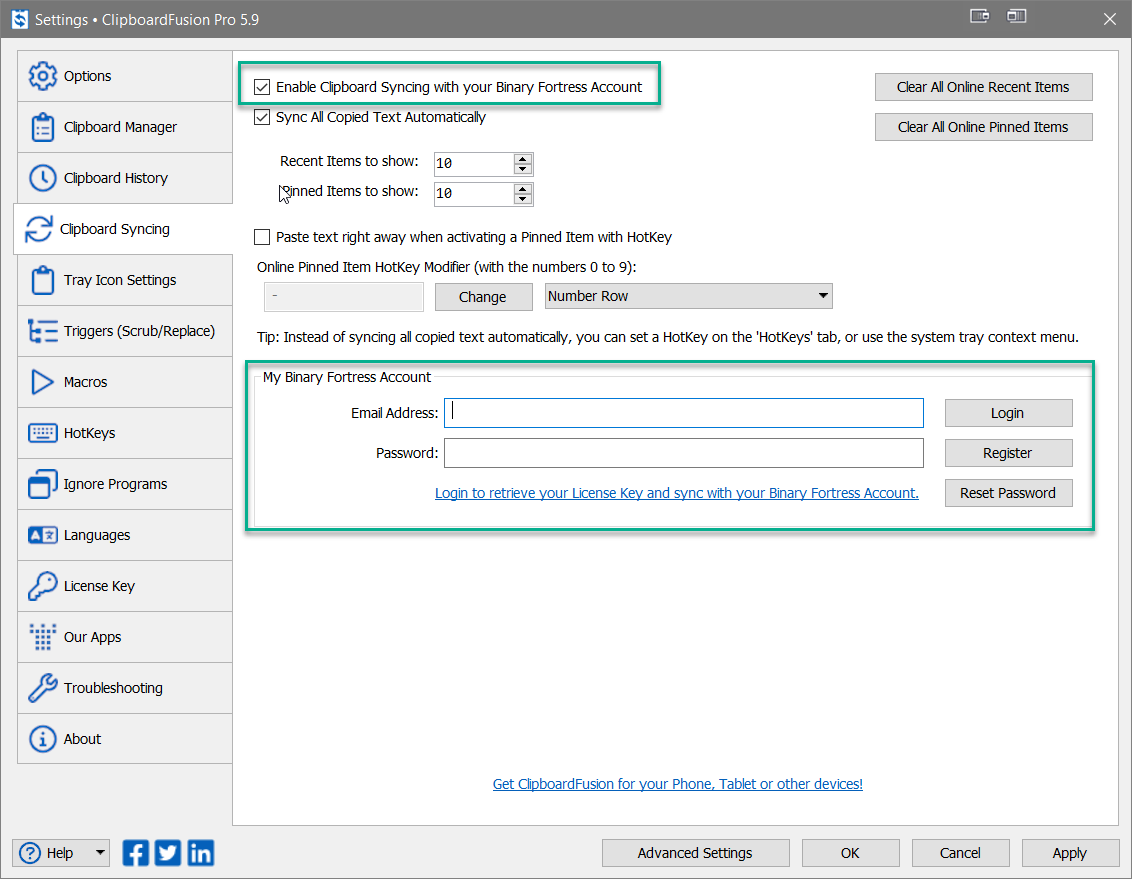
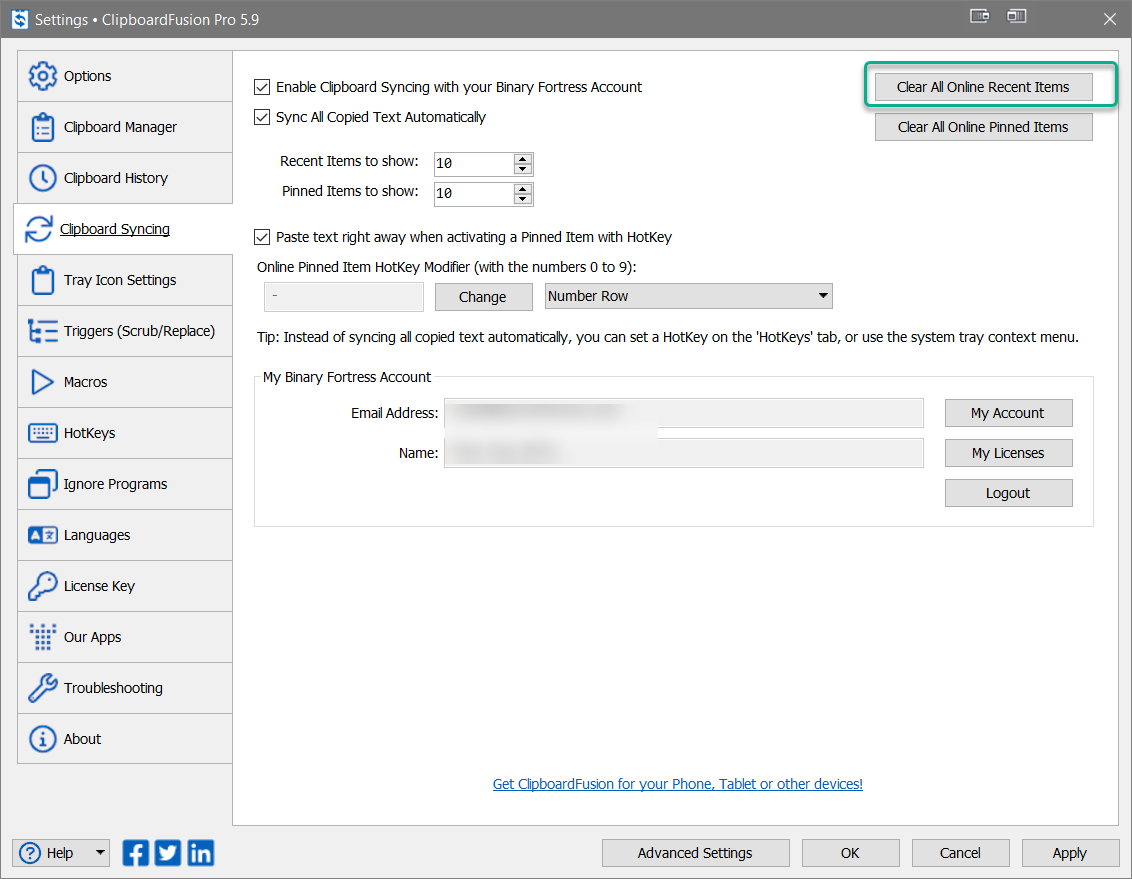
Clipboard syncing must be enabled and you must be logged into the same Binary Fortress account on both systems. Access to both requirements is available in the "
Clipboard Syncing" tab of the "
Settings" menu.
Enable the top checkbox and enter your login details below. Click "Login." If 2FA is enabled the prompt will ask for your code. If you have yet to create an account, you will need to click "Register."
This will take you to
clipboardfusion.com to create an account. Once that account is created you can return to ClipboardFusion and log in. If you have forgotten your password, click "Reset Password."
This will take you to
clipboardfusion.com. Enter your email address and click "Reset Password." Follow the emailed instructions and return to the "
Clipboard Syncing" menu of the ClipboardFusion software to log in.
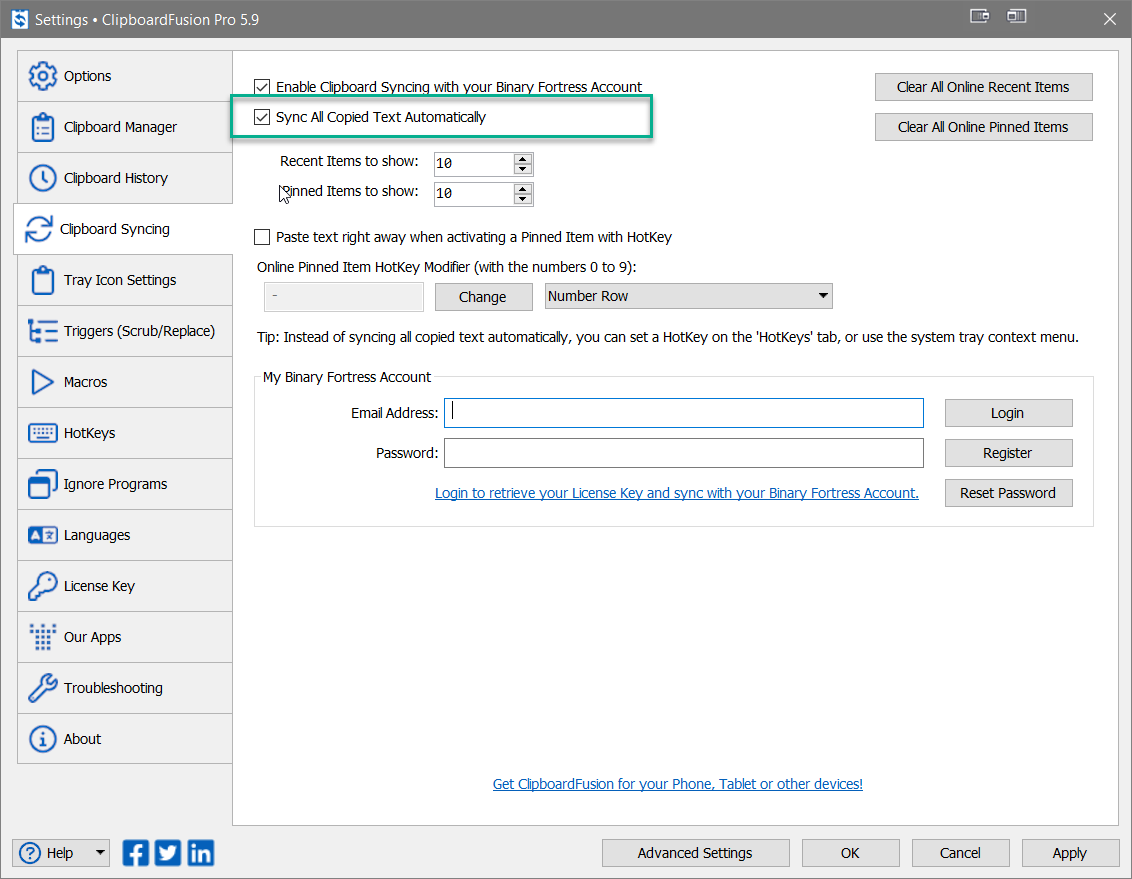
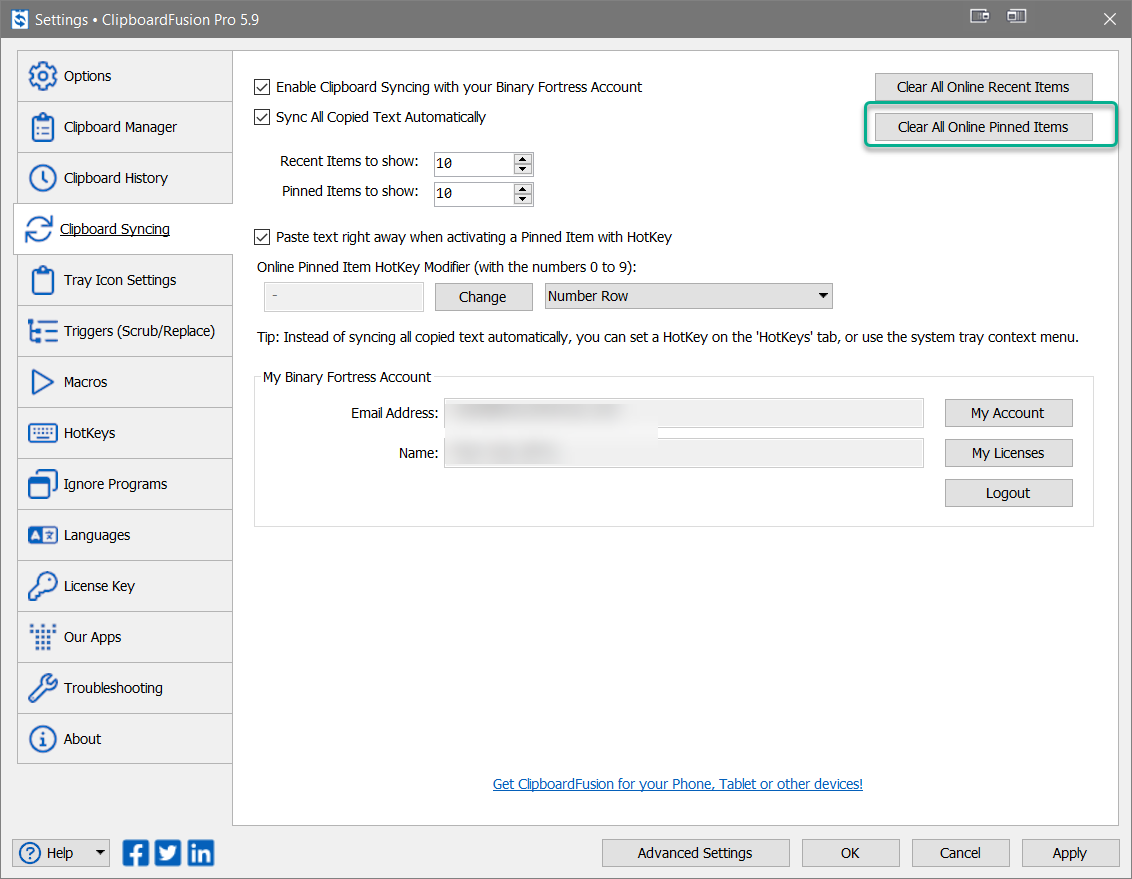
Clipboard text can be synced automatically to the "
Online Recent" tab list.
Navigate to "
Settings" and click the "
Clipboard Syncing" tab. Enable the checkbox by "Sync All Copied Text Automatically."
After your Settings changes are complete, click "Apply."
If the "Sync All Copied Text Automatically" option is disabled or was enabled after existing text was copied, some items will need to be added to the online tabs via the right-click menu. To ensure all items in the online tabs are synced for multi-system access, right-click on any item and click "
Sync."
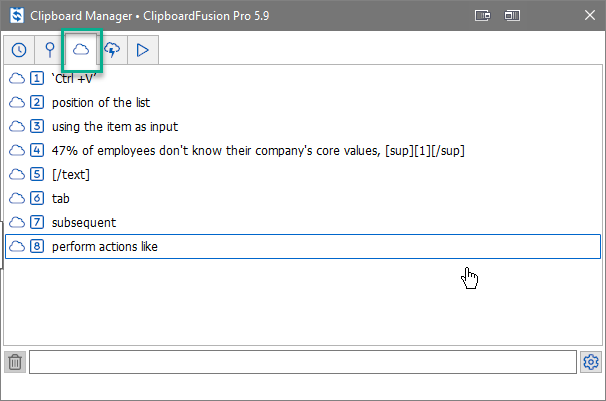
The "
Online Recent" tab can be considered an 'in-the-cloud' version of your local Clipboard History (the "History" tab).
See Clipboard Syncing to ensure you are configured to use this tab. To navigate to the "Online Recent" tab, right-click the system tray menu icon
and click "
Show Clipboard Manager." From the Clipboard Manager window click the tab with the cloud icon
.
To add clipboard items to the "Online Recent" tab, right-click on the item listed in the "History" or "Pinned" tabs and select "
Add to Online Recent."
Currently only text items can be added to these online tabs for syncing.
Clipboard text can be synced automatically to the "Online Recent" tab list. This option is found in the "
Clipboard Syncing" tab on the "
Settings" menu.
See Clipboard Syncing for more detail.
Like most other Clipboard Manager tabs, clicking on an item pastes it into the active (focused) window. Quick selection numbers can also be used to paste, and are assigned to items in the top 10 rows of each tab.
To learn more about these, see Item Selection and Auto-Pasting.
Right-clicking an item gives the option to "
Pin" it (moving it to the "Online Pinned" tab list), "
Remove" it, or paste the text one character at a time using the "
Type Text" option."
Using the " Pin" menu option from the " Online Recent" tab will remove it from that tab, adding the item to " Online Pinned."
You can also perform actions like "
Copy to Clipboard" (which moves it to the first position in the "History" tab) and "
Run Macro" using the item as input.
The "
Sync" option updates the "Online Recent," "Online Pinned," and "Macros" lists with the online servers.
To Remove a single item from the list, right-click on it and select "
Remove." To clear the entire "Online Recent" item list, go to the "
Clipboard Syncing" tab in "
Settings" and click "Clear All Online Recent Items."
In the confirmation prompt, click "Yes." In the "
Clipboard Syncing" window, click "OK."
The "
Online Pinned" tab can be considered an 'in-the-cloud' version of your "Local Pinned" list.
See Clipboard Syncing to ensure you are configured to use this tab. To navigate to the "Online Pinned" tab, right-click the system tray menu icon
and click "
Show Clipboard Manager." From the Clipboard Manager window click the tab with the cloud icon and the lightning bolt
.
To add clipboard items to the "Online Pinned" tab, right-click on the item listed in the "History" or "Pinned" tabs and select "
Add to Online Pinned."
Currently only text items can be added to these online tabs for syncing.For the "
Online Recent" tab, right-click and select "
Pin" instead.
Using the "Pin" menu option from the "Online Recent" tab will remove it from that tab, adding the item to "Online Pinned."
Newly-added "Online Pinned" items will move to the bottom of the "Online Pinned" list. Their placement can be altered by right-clicking the item and selecting "
Move Up" or "
Move Down" or by dragging and dropping the item to its new location in the list.
Clicking on an Online Pinned item pastes it into the active window. Quick selection numbers can also be used to paste, and are assigned to items in the top 10 rows of each tab.
To learn more about these, see Item Selection and Auto-Pasting.
Right-clicking an "Online Pinned" item gives the option to "(
/
) Move" it, "
Edit" it, "
Remove" it, "
Unpin" it, and rename it with "
Edit Name." You can also perform actions like "
Copy to Clipboard" (which moves the item to the first position in both the "History" and "Online Recent" tabs as the current copied item) and "
Run Macro" using the item as input.
The Name (identifiable label) of the item can be altered using the "Edit Name" option. Right-click on the item and select "
Edit Name." Type the new name in the field of the naming prompt and click "OK."
The "
Sync" option updates the "Online Recent," "Online Pinned," and "Macros" lists with the online servers.
To Remove a single item from the list, right-click on it and select "
Remove" or "
Unpin." To clear the "Online Pinned" item list, go to the "
Clipboard Syncing" tab in "
Settings" and click "Clear All Online Pinned Items."
Macros are small programs that can be run on clipboard items for quick and repetitive alterations, but they are not limited to clipboard actions. These programs can be run via menus, HotKeys, and when integrated with Trigger sequences. For full detail on Macro integration and use, see the
Triggers and Macros Help Guide.
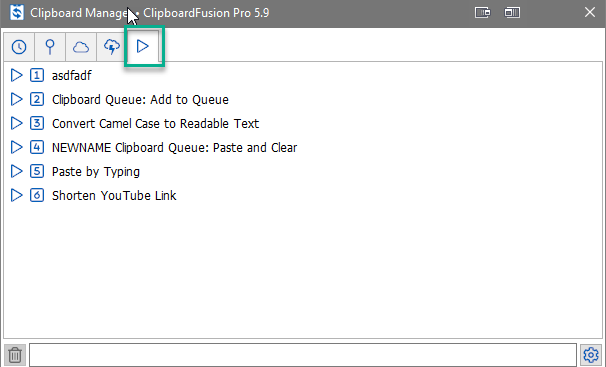
Macro import/download and settings, as well as the list of your existing Macros are available in the "
Macros" tab in the "
Settings" menu. They are also listed in the "Macros" tab of the Clipboard Manager. To navigate to the "Macros" tab, right-click the system tray menu icon
and click "
Show Clipboard Manager." From the Clipboard Manager window, click the tab with the triangle icon
.
Add Macros via the "Macros" tab in the "
Settings" menu. Click "Apply" when finished. Once applied, Macros listed there will also appear in the "
Macros" tab of the Clipboard Manager.
Clicking on a Macro will run the selection on current clipboard data (if needed). Quick selection numbers can also be used to run Macros, and are assigned to items in the top 10 rows of each tab.
To learn more about these, see Item Selection and Auto-Pasting.
Right-clicking a Macro gives the option to "
Edit" it or "
Remove" it.
The "
Sync" option updates the "Online Recent," "Online Pinned," and "Macros" lists with the online servers.
To remove a Macro from the "Macros" tab, right-click on the Macro and select "
Remove." This will automatically remove the Macro from the list in the "
Macros" tab of the "
Settings" menu as well.
Triggers allow you to perform multiple Actions, such as format scrubbing, text replacement, running Macros, and more. These Trigger Actions can be initiated manually or by various events. For full detail on Trigger actions, conditions, and general usage, see the
Triggers and Macros Help Guide.
ClipboardFusion makes it easy to remove clipboard text formatting, replace clipboard text or run powerful macros on your clipboard contents! You can even sync your clipboard with other computers and mobile devices.
To learn more about ClipboardFusion, visit:
https://www.clipboardfusion.comBinary Fortress has spent 19 years in pursuit of one goal: create software to make life easier. Our software ranges from display management and system enhancement utilities to monitoring tools and digital signage. IT administrators, professional gamers, coffee-shop owners, and MSPs all rely on Binary Fortress to make their days better, and their lives easier.
Copyright © 2007-2026 Binary Fortress Software, all rights reserved.
The Binary Fortress logo is a trademark of Binary Fortress Software.
The ClipboardFusion logo is a trademark of Binary Fortress Software.
Binary Fortress Software
1000 Innovation Drive, Suite 500
Kanata, Ontario, Canada
K2K3E7
https://www.binaryfortress.com